(+91) 8319733715
Info@aeero.ac.in
Student login
Organization Login
Admin Login

Aarav Educational & Employment Research Organization (AEERO)

Established Since 2018 Regd. Under Indian Trust Act 1882 Registration No. 245/18 Under Govt. of NCT of Delhi NGO Darpan/ NITI Aayog, Unique ID: DL/2023/0352409

YCMOU Admission Process 2025

Introduction

In this presentation, we will explore the detailed steps of the student admission process — from filling out personal information to fee payment. Each stage has been explained in a simple and structured manner to help students complete their online admission successfully.


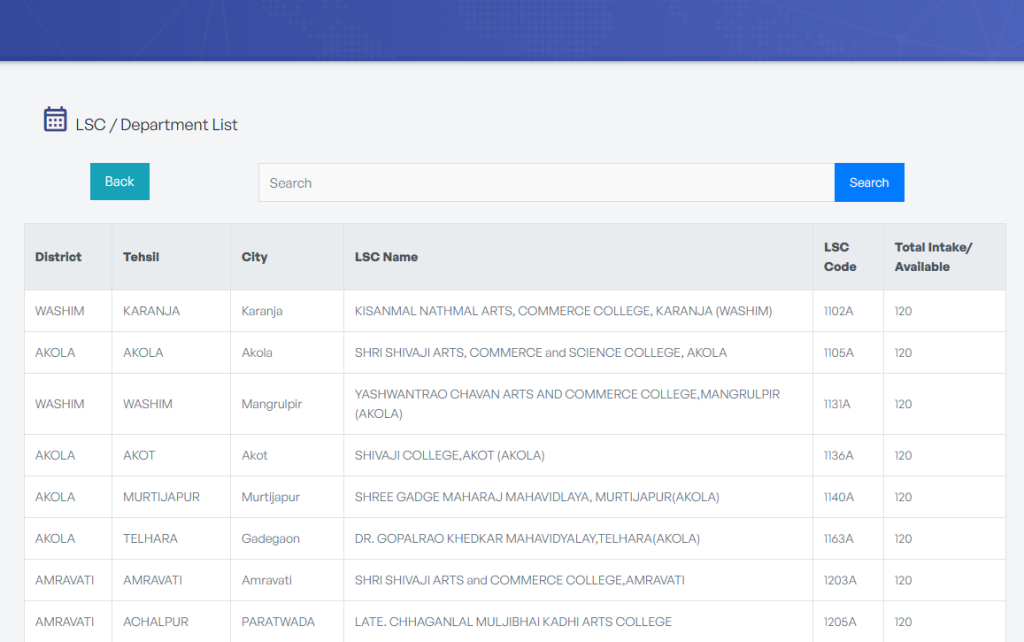
1. Admission Procedure Overview

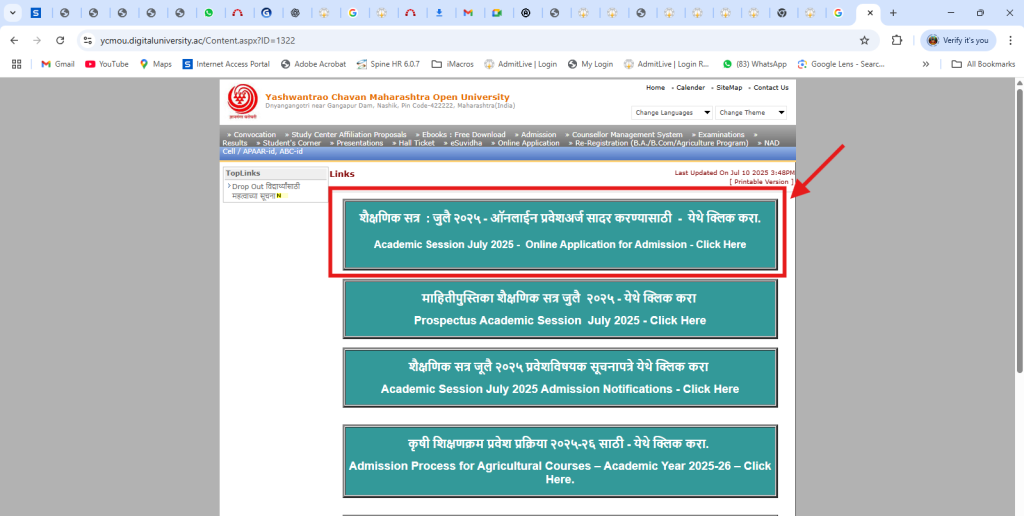
Students must visit the official website:
👉 https://ycmou.digitaluniversity.ac

Then, click on the Click Here For Admission button available on the homepage

For Guidance in Marathi – Click Here

Academic Session: July 2025
To submit an online admission application, click on:
👉 [Academic Session July 2025 – Online Application for Admission – Click Here]

After clicking the above link/button, proceed with the next steps.

Student Options

Students will see two options:

  1. Fresher Student (New Admission)

  2. Registered Student (Only SY/TY)

If you are a Fresher (New Student):

  • Click on the “Fresher Student” option.
    You will be redirected to the New User Registration page.

  • Even if you are an already registered student of YCMOU and wish to take admission in a new program (UG/PG/other courses), you must register again as a Fresher Student, even if you already have a 16-digit Permanent Registration Number.

If you are a Registered Student:

  • If you are applying for the second or third year of an existing course, click on the “Registered Student” option.

  • Use your existing Login ID and Password to access your account.

2. Application Schedule

By clicking the Application Schedule tab, students can:

  • View the list of all academic programs offered by the university.

  • See the number and names of study centers available for each program.

You can search using:

  • The Program Code or Program Name in the search bar.

  • Click on View to see all available study centers.

  • You can search centers by Name, Code, Taluka, District, or City.

3. New User Registration

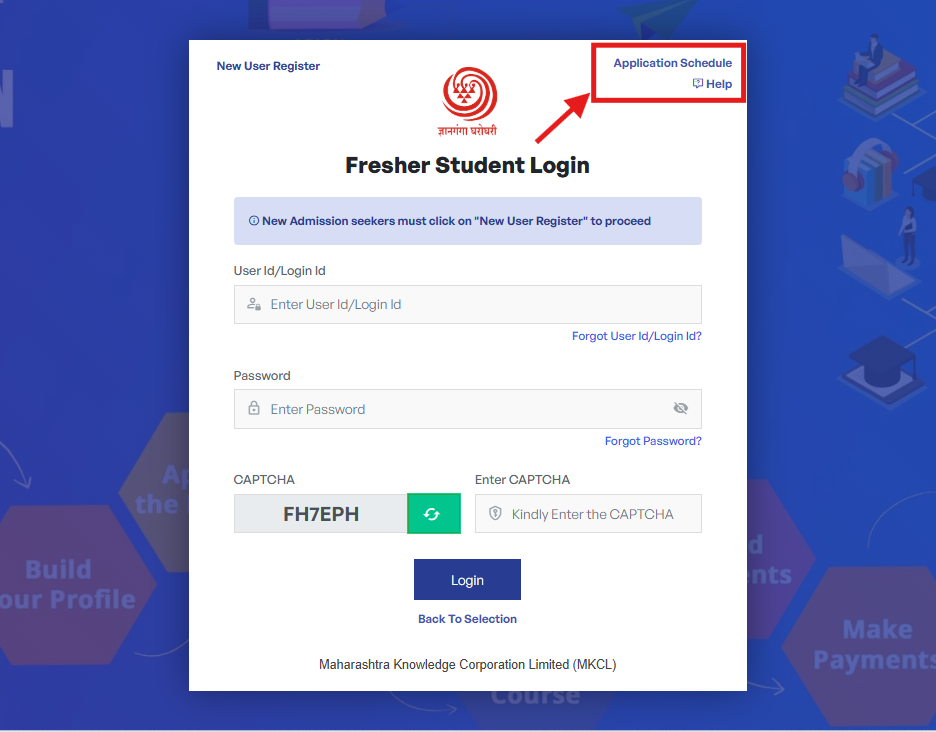
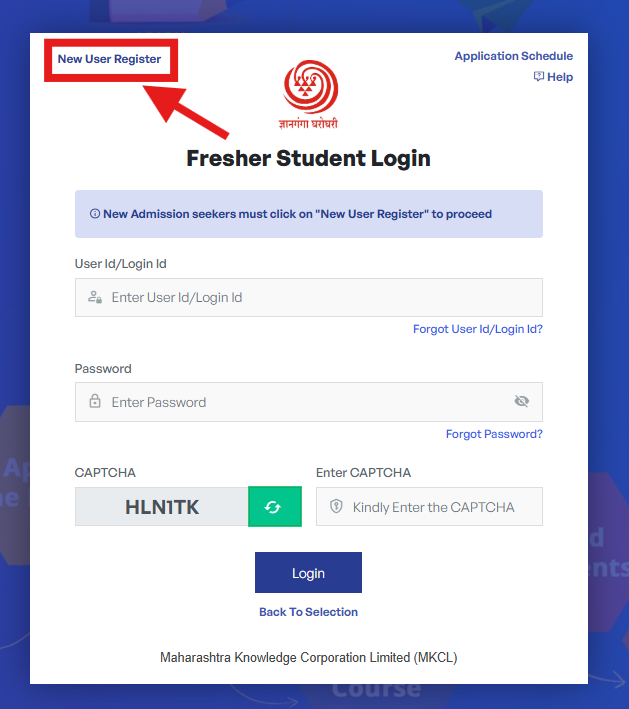
Click on the “New User Register” button.

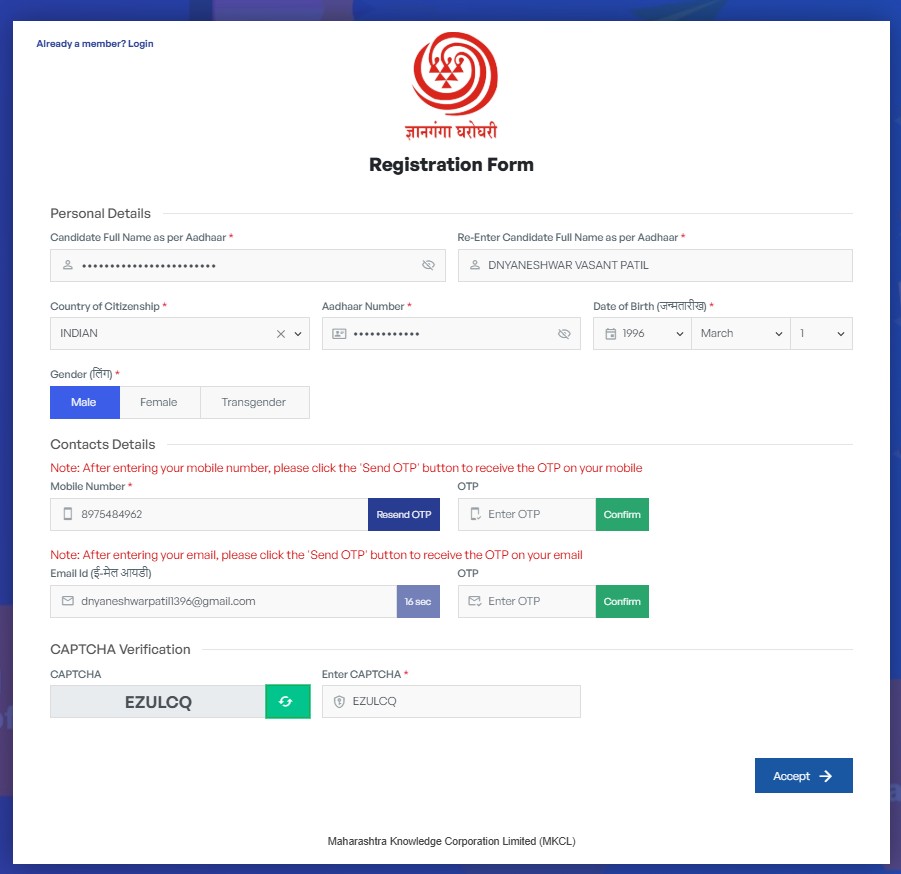
Instructions for Filling Registration Form

A) Candidate Full Name (As per Aadhaar)

  • Enter your full name exactly as it appears on your Aadhaar Card.

  • Enter it twice: once in the first box and again to confirm.

Example:
If Aadhaar shows “Dnyaneshwar Vasant Patil”
✅ Correct: Dnyaneshwar Vasant Patil
❌ Incorrect: Patil Dnyaneshwar Vasant


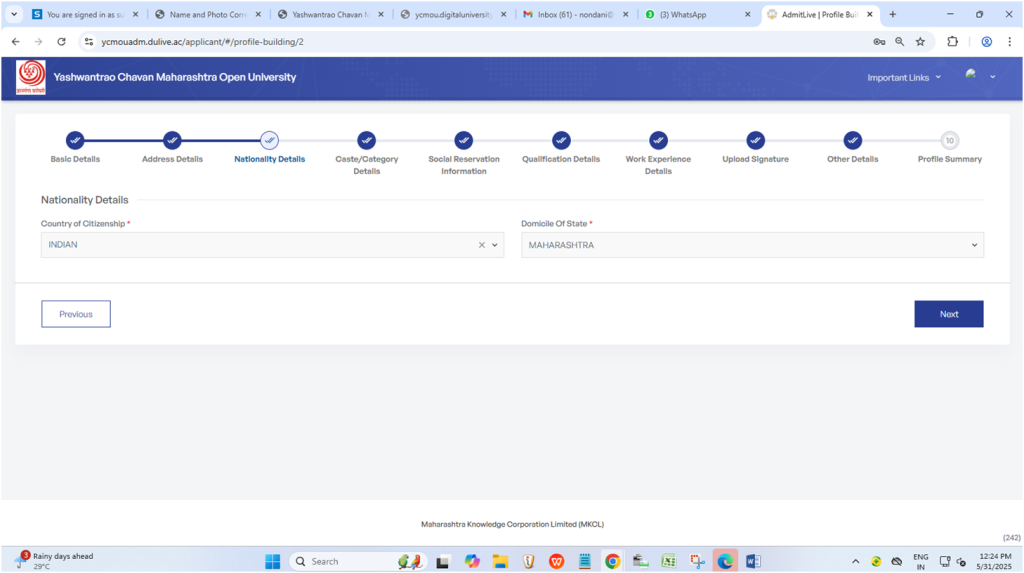
B) Country of Citizenship
Select INDIAN (default option).

C) Aadhaar Number
Enter your 12-digit Aadhaar number accurately.

D) Date of Birth

  • Select month, year, and date exactly as per Aadhaar.

  • Incorrect DOB may prevent further form submission.

E) Gender
Choose Male / Female / Transgender as applicable.
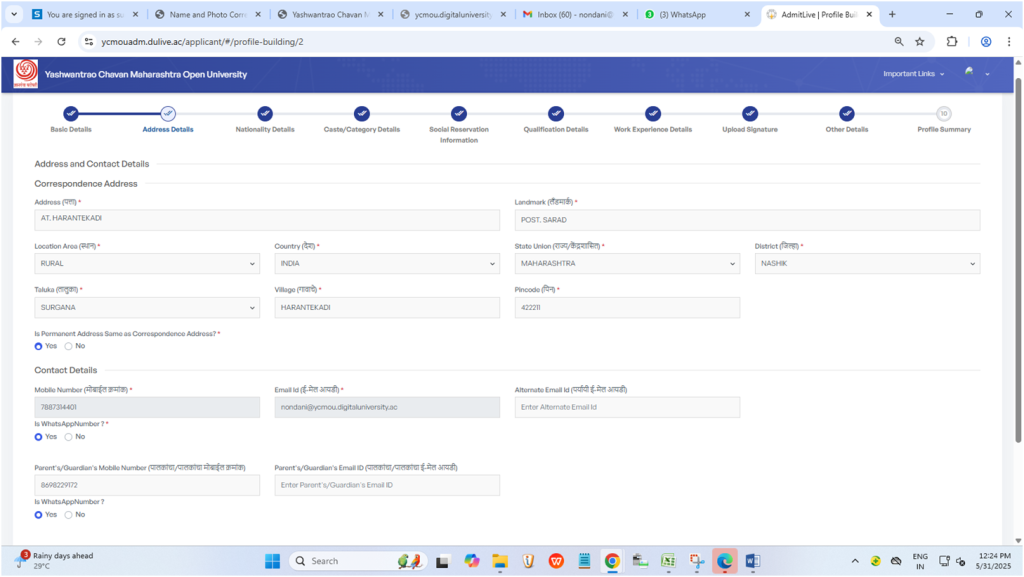

Contact Details

1. Mobile Number Verification

  • Enter your valid mobile number.

  • Click Send OTP to receive a One Time Password.

  • Enter the OTP to verify.
    Note: If this number has been used before, the system will reject it. Use a new valid number.

2. Email ID Verification

  • Enter a valid email address (e.g., abc@xyz.com).

  • Click Send OTP and enter the received code to verify.
    Note: Reused email IDs will not be accepted.

Set Password Screen

After OTP verification:

  • Enter Password: e.g., Ycmou@2025

  • Confirm Password: Re-enter the same password.

  • Click Submit / Save

Password must include:

  • Minimum 8 characters

  • At least one uppercase letter (A-Z)

  • One lowercase letter (a-z)

  • One number (0-9)

  • One special character (@, #, $, etc.)

Registration Successful

Message displayed:
✅ “You have successfully completed the registration process.”

You will receive a Login ID (e.g., 20251000001).
Use this ID for all future login and application steps.

4. Login (Fresher Student Login)

After registration, log in using your User ID and Password.
Enter the CAPTCHA (e.g., 2K4B8O) correctly.
Then fill out all required details to complete the admission process.
If you forget your password, use the Forgot Password option.


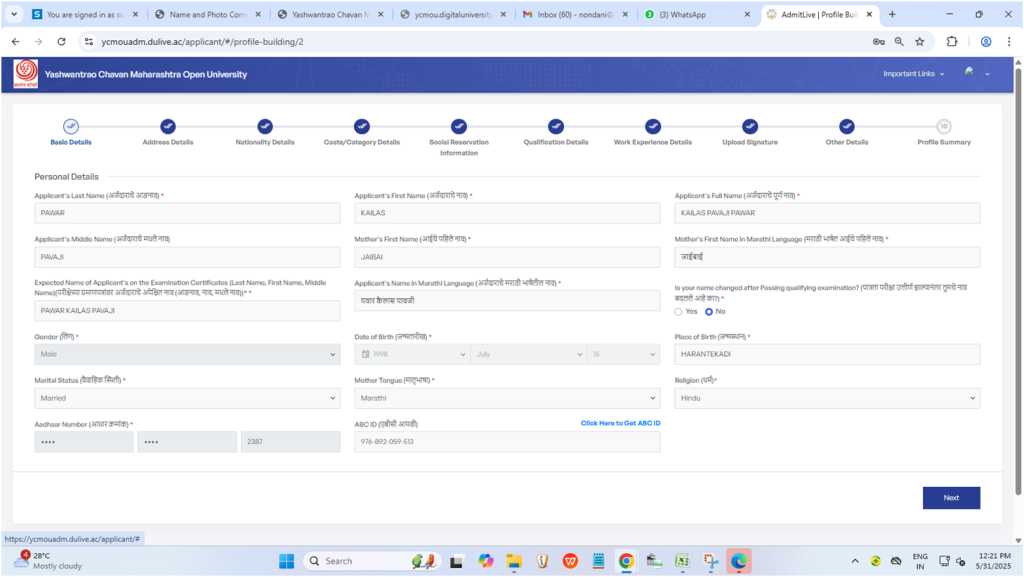
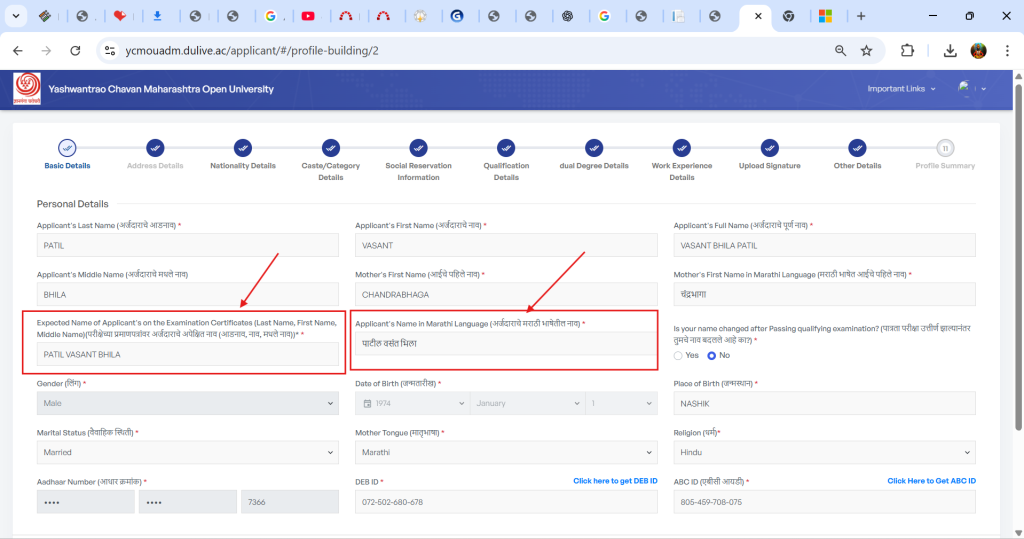
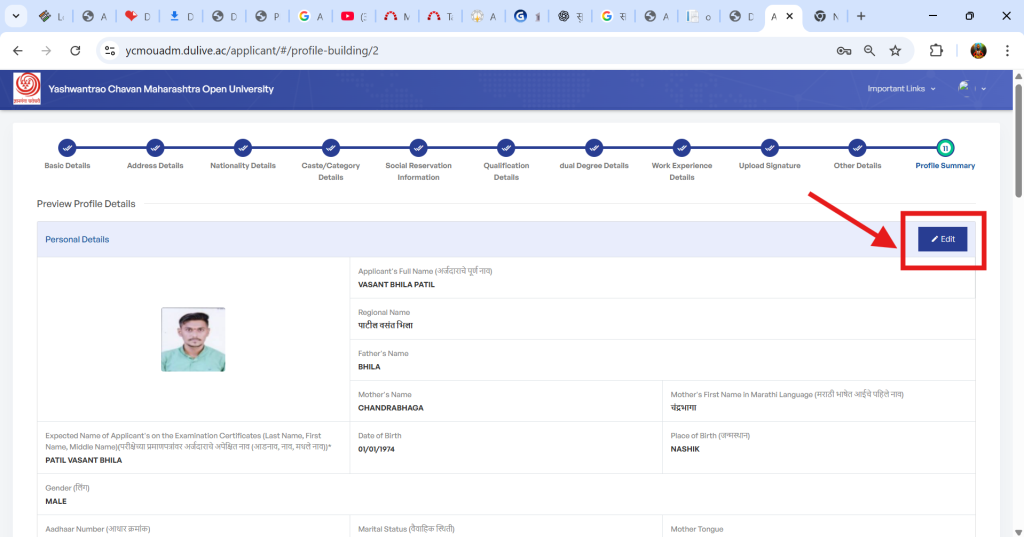
5. Filling Personal Information

Applicant Full Name

  • Must match exactly with the name on ABC ID or DEB ID.

  • Example:
    ✅ Dnyaneshwar Vasant Patil
    ❌ Patil Dnyaneshwar Vasant

  • If facing issues, open your DEB ID details and copy-paste the name.

Get Your ABC ID or DEB ID

Use the following links:

Expected Name on Examination Certificates

  • Enter your name in this format:
    Last Name, First Name, Middle Name
    (e.g., Patil, Dnyaneshwar, Vasant)

  • Ensure it matches your academic documents.

Applicant’s Name in Marathi

  • Enter your full name in Devanagari script (Marathi).
  • Ensure it matches Aadhaar or school certificate records.

If Name Changed After Qualification

If your name has changed after passing your last exam (due to marriage or legal reason):

  • Select Yes for “Has your name changed after qualifying examination?”

  • Mention old name, new name, and reason for change.

  • Upload proof such as Gazette Notification or Marriage Certificate (mandatory).

6. Address Details

Enter your address accurately.
Ensure it matches the address on Aadhaar, voter ID, or bank passbook.

7. Nationality Details

  • Nationality: Indian (default)

  • Domicile State: Select your state (e.g., Maharashtra, Gujarat, Karnataka)

  • Foreign nationals must select their respective country.

8. Caste/Category Details

  • Enter details exactly as per government-issued caste certificate.

  • Reservation students must enter the correct category (SC/ST/OBC/VJNT/EWS, etc.)

9. Social Reservation / Disability Information

  • Are you a Person with Disability? (Yes/No)
    If Yes, specify:

    • Type of Disability (e.g., Locomotor, Visual)

    • Percentage as per certificate (e.g., 45%)

    • Upload disability certificate in Documents Page.

10. Qualification Details

Enter accurate educational details (10th, 12th, Diploma, Graduation, PG, etc.)

For HSC-qualified students:
Your details are matched with the HSC Board database for instant approval.
Ensure all information is accurate.

11. Dual Degree Details

Question:
“Are you enrolled in any UG/PG program in another university this year?”

  • Yes: If studying in another university (e.g., Pune University, IGNOU, MU, etc.)

  • No: If not currently enrolled elsewhere.

12. Work Experience

If employed, enter your job details accurately.
If not, enter your parent’s occupation details.

13. Upload Signature and Photograph

Photograph:

  • Recent, clear, with light background.

  • Face should be visible.

Signature:

  • Sign in black/blue ink on white paper.

  • Scan or photograph the signature.

File Type: JPG / JPEG / PNG
Use English filenames (e.g., photo.jpg, sign.png).
Blurred or incorrect files may cause rejection.
Check the Preview before final submission.

14. Other Details

Sports Participation:
Mention sport name (e.g., Cricket, Kabaddi), level (School/Taluka/State/National), and any awards.

15. Profile Summary (Final Review)

Before confirmation, verify all sections:

  • Basic, Address, Nationality, Caste, Reservation

  • Qualification, Dual Degree, Work Experience

  • Photo & Signature, Other Details

If correction needed → Click Edit.
Once confirmed, no further edits allowed.

B) Student Application


1. Apply for Program

Search by Program Name or Code, verify, and click Apply next to the desired course.

2. Check Eligibility

View educational qualifications, age limits, and other criteria.
Read the prospectus carefully to ensure eligibility.

3. Select Learning Support Centre (LSC)

Choose a nearby and convenient study center from the displayed list.

4. Course Selection

  • Review available subjects carefully.

  • Choose subjects according to your preference and understanding.

  • Once selected, subjects cannot be changed later.

5. Applicant Scholarship

If scholarships are available:

  • Read all instructions carefully.

  • If you wish to apply, select “Yes” under “Do you want to apply under scholarship?”

6. Payment Category

If scholarship is applicable:

TypeFees (₹)
Regular Admission Fee₹3385
Scholarship Fee₹875

Fee amount depends on:

  • Selected program

  • Student category (SC/ST/OBC/VJNT/EWS)

If not eligible, full fee applies.

7. Scholarship Document Upload

Upload required documents (PDF/JPEG) clearly and correctly.
If not applying for scholarship, select “No” and proceed with full fee payment.

If the Student Does Not Wish to Apply Under Scholarship

If a student does not wish to take admission under the scholarship scheme, follow the instructions below:

In the “Applicant Scholarship” tab, read the instructions carefully.
When asked —

“Do you wish to apply for admission under the scholarship scheme?”
Select “NO”.

What Happens When You Select “NO”?

  • The Regular Fee Structure (full admission fee) will be applicable to the student.

  • When the student chooses “NO” for the scholarship option:
    → In the Payment Category tab, the full course fee for the selected program will be displayed.

  • No concession or discount will be applied to this fee.

If the student has selected “NO” for scholarship benefits, then:
→ On the Document Upload page, only those documents related to educational eligibility for the selected course will be shown for upload.
(No scholarship-related document upload will appear.)

7) HSC Match and Make Payment

After submitting documents, the system verifies eligibility and then allows fee payment.

1️⃣ If HSC Information Is Correct:

If the selected course requires HSC (12th) qualification, and
the student has correctly filled in all HSC details and submitted documents —
then the system automatically matches the information with the HSC Board database.

✅ If the details match:

  • The application gets immediate approval

  • The Fee Payment option becomes available instantly.


2️⃣ If HSC Information Does Not Match:

If the system cannot verify your HSC details,
the application goes for manual approval at the university level.

⏳ Until the university approves the application,
the Fee Payment option will not be available.

Once approved by the university,
the Fee Payment facility will be activated.

⚠️ Approval may take some time.
Students should regularly check their application status by logging in and viewing the “Application Status” section.


Approval Takes Place at Two Levels:

  1. Regional Centre (RC):

    • Approval for Postgraduate (PG) programs and DSM (Diploma in School Management) is handled at the Regional Centre level.

  2. University Headquarters (HQ):

    • Approval for all other programs (except PG and DSM) is done at the University Headquarters.

To know where your application will be approved,
check the type of course you have selected and contact the relevant level accordingly.

8) Application Status – Checking the Status of Your Application

In the “Application Status” tab, students can view the complete status of their application.

The following details are displayed:

  • Application Number: Unique ID of the application

  • LSC Name / Code: Name and code of the selected Learning Support Centre

  • Programme Name: e.g., Bachelor of Arts, B.Com, M.A., etc.

  • Status: Current application stage – Approved / Pending / Rejected

  • Current Step: Indicates the current process step

  • Date: Date when the application was submitted

  • Actions: Options to View, Edit, Print, or Reapply

Explanation of Application Status Types


🔸 Status: Approval Pending

Current Step: Approval (SCHOLARSHIP) / HQ Approval

Meaning:
Your application has not yet been approved.
It is under manual verification by the University or Scholarship Department.

✅ Once approved, the next step (Fee Payment) will become available.

🔸 Status: Rejected / Sent Back to Student

Current Step: Documents Upload

Meaning:
Your application has been sent back by the university due to incorrect, incomplete information, or invalid documents.

What You Should Do:

  1. Click on the Action button.

  2. Follow the remarks or instructions provided by the university.

  3. Re-upload the correct and valid documents.

  4. Resubmit the application for approval.

Important Note:
Only applications with accurate and complete information will be approved.
Students should regularly check their Application Status for updates.

🔸 Status: Approved

Current Step: Payment

Meaning:
Your application has been verified and approved by the university.

Next Step:
Proceed to pay the course fee for final admission.

Click the Action button → Go to Payment Gateway → Complete the payment online.

Note:

  • Admission is confirmed only after successful fee payment.

  • Ensure a stable internet connection while making the payment.